<?xml version="1.0" encoding="utf-8"?><feed xmlns="http://www.w3.org/2005/Atom" ><generator uri="https://jekyllrb.com/" version="3.10.0">Jekyll</generator><link href="/feed.xml" rel="self" type="application/atom+xml" /><link href="/" rel="alternate" type="text/html" /><updated>2026-07-30T21:15:21+00:00</updated><id>/feed.xml</id><title type="html">Premek’s blog</title><entry><title type="html">Share phone and Linux PC clipboard</title><link href="/2024/11/11/kdeconnect-clipboard-sync.html" rel="alternate" type="text/html" title="Share phone and Linux PC clipboard" /><published>2024-11-11T00:00:00+00:00</published><updated>2024-11-11T00:00:00+00:00</updated><id>/2024/11/11/kdeconnect-clipboard-sync</id><content type="html" xml:base="/2024/11/11/kdeconnect-clipboard-sync.html"><![CDATA[<p>Clipboard sync is my favourite KDE Connect feature. 
Great for copy-pasting one-time passwords :)</p>

<!--more-->

<p>Install <strong>KDE Connect</strong> on your <a href="https://play.google.com/store/apps/details?id=org.kde.kdeconnect_tp">phone</a>
and on your desktop. 
On Gnome you can use <a href="https://extensions.gnome.org/extension/1319/gsconnect/">GSConnect</a>.
Pair the two devices in the app. You can test the connection, for example by moving your PC mouse cursor from the phone (“Remote input”).</p>

<p>Automatic clipboard access is disabled on newer Android for security reasons but there is a workaround in KDE Connect.
You will need <a href="https://developer.android.com/studio/debug/dev-options">USB debugging</a> enabled on your phone.
(<em>You are now a developer!</em>) You don’t need phone’s root access for this method.</p>

<p>Install <code class="language-plaintext highlighter-rouge">adb</code> (part of <a href="https://developer.android.com/tools/releases/platform-tools">SDK Platform Tools</a>) on your PC.</p>

<p>Connect your phone using USB. You can test the connection using the <code class="language-plaintext highlighter-rouge">adb devices</code> command. You should see at least one device connected:</p>
<div class="language-plaintext highlighter-rouge"><div class="highlight"><pre class="highlight"><code>List of devices attached
ZX11JJGGJS	device
</code></pre></div></div>

<p>Run the following commands:</p>
<div class="language-plaintext highlighter-rouge"><div class="highlight"><pre class="highlight"><code>adb -d shell pm grant org.kde.kdeconnect_tp android.permission.READ_LOGS;
adb -d shell appops set org.kde.kdeconnect_tp SYSTEM_ALERT_WINDOW allow;
adb -d shell am force-stop org.kde.kdeconnect_tp;
</code></pre></div></div>

<p>You might need to confirm something on the phone’s screen.</p>

<p>The last command should stop kdeconnect on your phone,
and after you start it again and leave it running in the background the 
automatic clipboard sync should work.
I had to restart kdeconnect one more time.</p>

<h3 id="troubleshooting">Troubleshooting</h3>
<div class="language-plaintext highlighter-rouge"><div class="highlight"><pre class="highlight"><code>Operation not allowed: java.lang.SecurityException: grantRuntimePermission: Neither user 2000 nor current process has android.permission.GRANT_RUNTIME_PERMISSIONS.
</code></pre></div></div>
<p>means you need to enable USB debugging on your phone.</p>

<h3 id="notes">Notes</h3>

<p>Unfortunately you have to repeat these steps if kdeconnect is restarted on your phone…</p>]]></content><author><name></name></author><summary type="html"><![CDATA[Clipboard sync is my favourite KDE Connect feature. Great for copy-pasting one-time passwords :)]]></summary></entry><entry><title type="html">Bash: Remove files to trash</title><link href="/2024/05/11/rm-trash.html" rel="alternate" type="text/html" title="Bash: Remove files to trash" /><published>2024-05-11T00:00:00+00:00</published><updated>2024-05-11T00:00:00+00:00</updated><id>/2024/05/11/rm-trash</id><content type="html" xml:base="/2024/05/11/rm-trash.html"><![CDATA[<p>After returning from holiday, my muscle memory failed and my fingers did something weird:</p>
<div class="language-sh highlighter-rouge"><div class="highlight"><pre class="highlight"><code><span class="nb">rm </span>somethingiwantedtoremove <span class="nt">-rf</span> <span class="k">*</span>
</code></pre></div></div>

<!--more-->

<p>Luckily it was not my home folder or anything else but a folder called <code class="language-plaintext highlighter-rouge">downloads</code>. It contained years of important stuff.</p>

<p>So I thought why <code class="language-plaintext highlighter-rouge">rm</code> does not allow undo?</p>

<p>There is a <code class="language-plaintext highlighter-rouge">trash-cli</code> command that uses the same trash can as Gnome. You can install it with apt:</p>
<div class="language-sh highlighter-rouge"><div class="highlight"><pre class="highlight"><code><span class="nb">sudo </span>apt <span class="nb">install </span>trash-cli
</code></pre></div></div>

<p>Aliasing <code class="language-plaintext highlighter-rouge">rm</code> to is is probably not a good idea but you can block yourself from using <code class="language-plaintext highlighter-rouge">rm</code> and remind yourself to use the alternative instead. <code class="language-plaintext highlighter-rouge">rm</code> will still work in scripts.</p>

<div class="language-sh highlighter-rouge"><div class="highlight"><pre class="highlight"><code><span class="nb">alias rm</span><span class="o">=</span><span class="s1">'echo "Use \"trash\" instead or prepend a backslash: \"\\rm\"."; false'</span>
<span class="nb">alias </span><span class="nv">trash</span><span class="o">=</span><span class="s2">"trash-put"</span>
<span class="c">#alias trash="gio trash"</span>
</code></pre></div></div>

<p><code class="language-plaintext highlighter-rouge">trash-cli</code> (<code class="language-plaintext highlighter-rouge">trash-put</code>) should work with Gnome, Kde, Xfce. There is also a <code class="language-plaintext highlighter-rouge">gio trash</code> command for Gnome.</p>]]></content><author><name></name></author><summary type="html"><![CDATA[After returning from holiday, my muscle memory failed and my fingers did something weird: rm somethingiwantedtoremove -rf *]]></summary></entry><entry><title type="html">Debian Linux on Thinkpad L490</title><link href="/2019/11/22/thinkpad-l490-debian-linux.html" rel="alternate" type="text/html" title="Debian Linux on Thinkpad L490" /><published>2019-11-22T00:00:00+00:00</published><updated>2019-11-22T00:00:00+00:00</updated><id>/2019/11/22/thinkpad-l490-debian-linux</id><content type="html" xml:base="/2019/11/22/thinkpad-l490-debian-linux.html"><![CDATA[<p>Trackpoint &amp; touchpad and wifi were (hopefully) the only things that didn’t work right after installation of Debian Buster on my Lenovo Thinkpad L490.</p>

<h1 id="wifi">Wifi</h1>
<p>It didn’t work during installation so I installed using an eth cable and then I had to:</p>

<ul>
  <li>add <code class="language-plaintext highlighter-rouge">non-free</code> and <code class="language-plaintext highlighter-rouge">contrib</code> repositories to <code class="language-plaintext highlighter-rouge">/etc/apt/sources.list</code>: <br />
 <code class="language-plaintext highlighter-rouge">deb http://deb.debian.org/debian buster main contrib non-free</code></li>
  <li>install <code class="language-plaintext highlighter-rouge">firmware-linux-nonfree</code> and <code class="language-plaintext highlighter-rouge">firmware-iwlwifi</code> packages</li>
</ul>

<h1 id="trackpoint--touchpad">Trackpoint &amp; touchpad</h1>
<p>To make it work you need to add a parameter to <code class="language-plaintext highlighter-rouge">psmouse</code> module. To test if it works:</p>

<div class="language-sh highlighter-rouge"><div class="highlight"><pre class="highlight"><code><span class="nb">sudo </span>rmmod psmouse
<span class="nb">sudo </span>modprobe psmouse <span class="nv">proto</span><span class="o">=</span>imps
</code></pre></div></div>

<p>And to make it permanent:</p>

<div class="language-sh highlighter-rouge"><div class="highlight"><pre class="highlight"><code><span class="nb">echo </span>options psmouse <span class="nv">proto</span><span class="o">=</span>imps | <span class="nb">sudo tee</span> /etc/modprobe.d/mouse.conf
<span class="nb">sudo </span>update-initramfs <span class="nt">-c</span> <span class="nt">-k</span> all
<span class="nb">sudo </span>update-grub
<span class="nb">sudo </span>reboot
</code></pre></div></div>

<h1 id="fingerprint-reader">Fingerprint reader</h1>
<p>I haven’t managed to make it work.</p>

<h1 id="cooling-and-battery-life">Cooling and Battery Life</h1>

<p>There is some problem with cooling or maybe just with some sensors which I still haven’t figured out. <code class="language-plaintext highlighter-rouge">dmesg</code> has messages like this quite often:</p>

<div class="language-plaintext highlighter-rouge"><div class="highlight"><pre class="highlight"><code>[69668.650479] mce: CPU0: Package temperature above threshold, cpu clock throttled (total events = 3882682)
[69668.650481] mce: CPU2: Package temperature above threshold, cpu clock throttled (total events = 3882682)
[69668.650482] mce: CPU6: Package temperature above threshold, cpu clock throttled (total events = 3882682)
[69668.651560] mce: CPU5: Package temperature/speed normal
[69668.651561] mce: CPU1: Package temperature/speed normal
[69668.651562] mce: CPU4: Package temperature/speed normal
[69668.651563] mce: CPU0: Package temperature/speed normal
</code></pre></div></div>

<p>The battery life is definitely not the advertised 12 hours. Or the estimate in Gnome is wrong. It says 76% after being charged for days and 3 hours remaining (!) when unplugged. But I havent done any proper testing.</p>

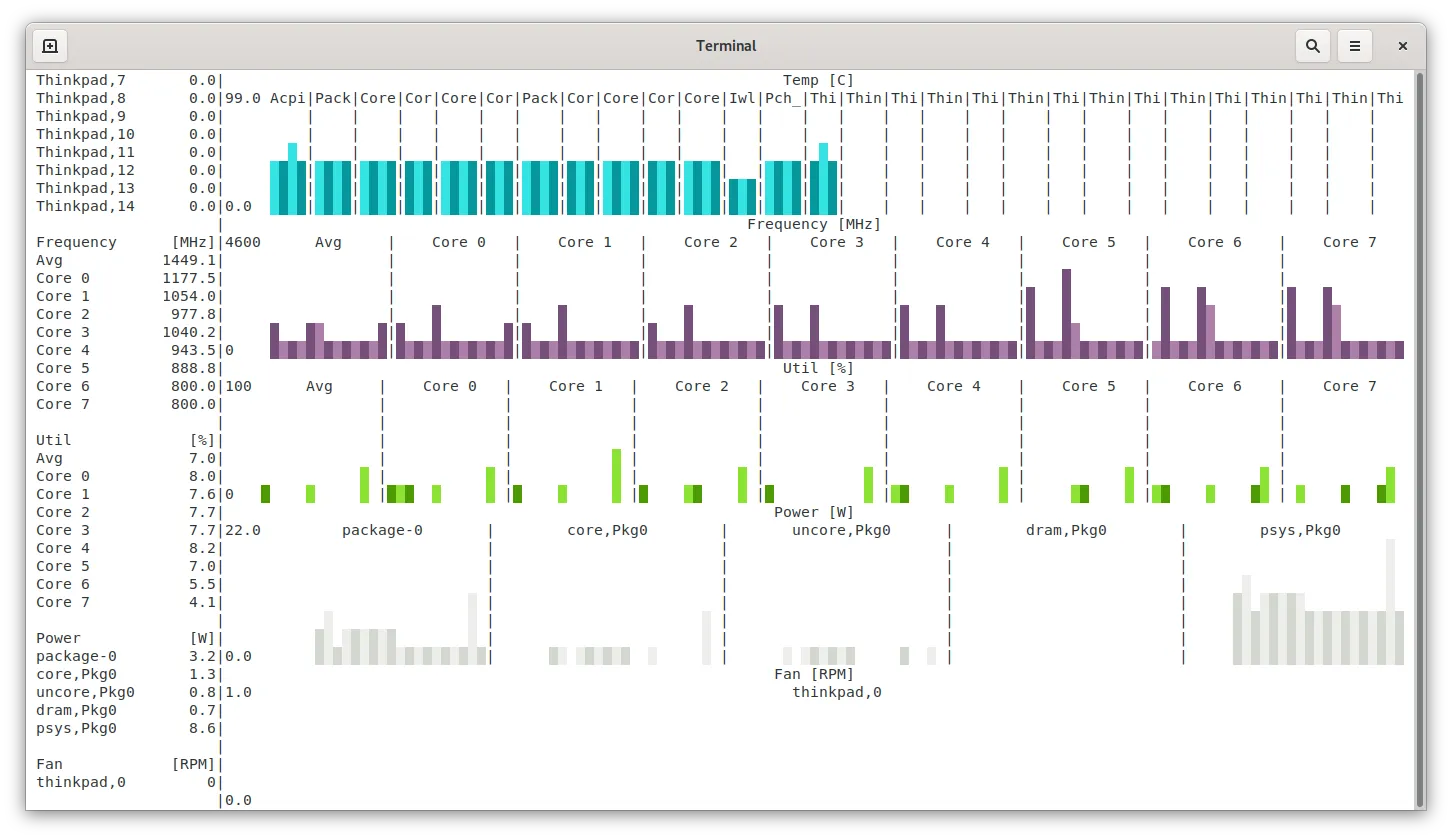
<p><code class="language-plaintext highlighter-rouge">s-tui</code> output with Gnome running, a few opened Chrome windows and an idle IntelliJ Idea:</p>

<p><img src="/assets/2019-thinkpad.webp" alt="screenshot of a terminal with s-tui app running" /></p>]]></content><author><name></name></author><summary type="html"><![CDATA[Trackpoint &amp; touchpad and wifi were (hopefully) the only things that didn’t work right after installation of Debian Buster on my Lenovo Thinkpad L490.]]></summary></entry><entry><title type="html">How to connect to a NTLMv2 share in Linux</title><link href="/2018/04/17/ntlmv2-linux-samba.html" rel="alternate" type="text/html" title="How to connect to a NTLMv2 share in Linux" /><published>2018-04-17T00:00:00+00:00</published><updated>2018-04-17T00:00:00+00:00</updated><id>/2018/04/17/ntlmv2-linux-samba</id><content type="html" xml:base="/2018/04/17/ntlmv2-linux-samba.html"><![CDATA[<p>If you just need to download a file you can use <code class="language-plaintext highlighter-rouge">smbclient</code> to connect to a NTLMv2 Windows share from Linux. You don’t need to edit <code class="language-plaintext highlighter-rouge">smb.conf</code> or any config file, just add the <code class="language-plaintext highlighter-rouge">-m SMB2</code> command line parameter.</p>

<div class="language-sh highlighter-rouge"><div class="highlight"><pre class="highlight"><code><span class="nv">$ </span>smbclient <span class="nt">-m</span> SMB2 <span class="nt">-U</span> usernanme <span class="nt">-W</span> workgroup //server/service
</code></pre></div></div>

<p>For example:</p>

<div class="language-sh highlighter-rouge"><div class="highlight"><pre class="highlight"><code><span class="nv">$ </span>smbclient <span class="nt">-m</span> SMB2 <span class="nt">-U</span> premek <span class="nt">-W</span> acme.local //10.20.30.40/public
</code></pre></div></div>

<p>And to download all files in a remote directory:</p>

<div class="language-sh highlighter-rouge"><div class="highlight"><pre class="highlight"><code><span class="nv">$ </span>smbclient <span class="nt">-m</span> SMB2 <span class="nt">-U</span> premek <span class="nt">-W</span> acme.local //10.20.30.40/public <span class="se">\ </span>
 <span class="nt">-c</span> ‘prompt OFF<span class="p">;</span>recurse ON<span class="p">;</span><span class="nb">cd</span> ‘path/to/remote/dir’<span class="p">;</span>mget <span class="k">*</span>’
</code></pre></div></div>]]></content><author><name></name></author><summary type="html"><![CDATA[If you just need to download a file you can use smbclient to connect to a NTLMv2 Windows share from Linux. You don’t need to edit smb.conf or any config file, just add the -m SMB2 command line parameter.]]></summary></entry><entry><title type="html">Configuring mvn deploy with svn+ssh</title><link href="/2018/02/27/mvn-deploy-svn-ssh.html" rel="alternate" type="text/html" title="Configuring mvn deploy with svn+ssh" /><published>2018-02-27T00:00:00+00:00</published><updated>2018-02-27T00:00:00+00:00</updated><id>/2018/02/27/mvn-deploy-svn-ssh</id><content type="html" xml:base="/2018/02/27/mvn-deploy-svn-ssh.html"><![CDATA[<p>So just a few notes how I configured <code class="language-plaintext highlighter-rouge">mvn deploy</code> with <code class="language-plaintext highlighter-rouge">svn+ssh</code>. It may not work for you the same way it did for me but maybe it can help a bit.</p>

<h1 id="ssh-config">SSH Config</h1>
<p>The repository URL in your configuration and the one of your repository has to be the same. So you don’t want your username in it. Put it in <code class="language-plaintext highlighter-rouge">~/.ssh/config</code> instead:</p>

<div class="language-plaintext highlighter-rouge"><div class="highlight"><pre class="highlight"><code>Host your_host_or_ip
 User your_svn_username
</code></pre></div></div>

<p>If you use both IP and hostname, put here both.</p>

<p>And do the clear checkout so you don’t see your name when doing <code class="language-plaintext highlighter-rouge">svn info</code>.</p>

<p>I use private key for ssh login to that host and no password.</p>

<h1 id="maven-config">Maven config</h1>

<p>This goes into the <code class="language-plaintext highlighter-rouge">pom.xml</code>. Replace <code class="language-plaintext highlighter-rouge">1.1.1.1</code> with your IP address or host. <code class="language-plaintext highlighter-rouge">/path/to/trunk/</code> is what you see in <code class="language-plaintext highlighter-rouge">svn info</code> but you also have to include any subdirectory of your project (the one that contains <code class="language-plaintext highlighter-rouge">pom.xml</code>).</p>

<div class="language-xml highlighter-rouge"><div class="highlight"><pre class="highlight"><code><span class="nt">&lt;scm&gt;</span>
<span class="nt">&lt;connection&gt;</span>scm:svn:svn+ssh://1.1.1.1/path/to/trunk/and/project/<span class="nt">&lt;/connection&gt;</span>
<span class="nt">&lt;developerConnection&gt;</span>scm:svn:svn+ssh://1.1.1.1/path/to/trunk/and/project/<span class="nt">&lt;/developerConnection&gt;</span>
<span class="nt">&lt;url&gt;</span>scm:svn:svn+ssh://1.1.1.1/path/to/trunk/and/project/<span class="nt">&lt;/url&gt;</span>
<span class="nt">&lt;/scm&gt;</span>
</code></pre></div></div>

<p><code class="language-plaintext highlighter-rouge">distributionManagement</code> defines where you deploy your artifacts to. Don’t forget to specify a repository with deploy permissions (e.g. libs-releases-local). You may need some additional config in <code class="language-plaintext highlighter-rouge">.m2/settings.xml</code> with your credentials.</p>

<div class="language-xml highlighter-rouge"><div class="highlight"><pre class="highlight"><code><span class="nt">&lt;distributionManagement&gt;</span>
 <span class="nt">&lt;repository&gt;</span>
 <span class="nt">&lt;name&gt;</span>libs-releases-local<span class="nt">&lt;/name&gt;</span>
 <span class="nt">&lt;url&gt;</span>http://1.1.1.1:2222/artifactory/libs-releases-local<span class="nt">&lt;/url&gt;</span>
 <span class="nt">&lt;id&gt;</span>repo<span class="nt">&lt;/id&gt;</span>
 <span class="nt">&lt;/repository&gt;</span>
<span class="nt">&lt;/distributionManagement&gt;</span>
</code></pre></div></div>

<h1 id="mvn-release">mvn release</h1>
<p>Now, you prepare your release first, then perform, then realize you fucked it up, rollback, delete the svn tag (important!) and try again.</p>

<div class="language-sh highlighter-rouge"><div class="highlight"><pre class="highlight"><code>mvn release:prepare
mvn release:perform
mvn release:rollback
svn <span class="nb">rm</span> ^/tags/YourProject-3.30/ <span class="nt">-m</span> <span class="s1">'rollback tag'</span>
</code></pre></div></div>

<p>If you need to rollback when you misconfigured your username, use <code class="language-plaintext highlighter-rouge">mvn -Dusername=yourusername release:rollback</code></p>

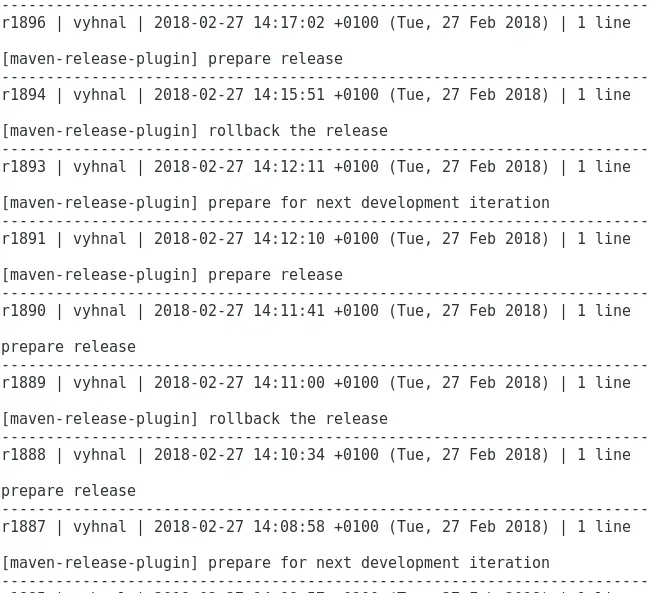
<p>prepare, rollback, repeat:</p>

<p><img src="/assets/2018-prepare-release.webp" alt="a screenshot from git log" /></p>]]></content><author><name></name></author><summary type="html"><![CDATA[So just a few notes how I configured mvn deploy with svn+ssh. It may not work for you the same way it did for me but maybe it can help a bit.]]></summary></entry><entry><title type="html">The smallest webcam under Linux</title><link href="/2017/04/25/linux-small-webcam.html" rel="alternate" type="text/html" title="The smallest webcam under Linux" /><published>2017-04-25T00:00:00+00:00</published><updated>2017-04-25T00:00:00+00:00</updated><id>/2017/04/25/linux-small-webcam</id><content type="html" xml:base="/2017/04/25/linux-small-webcam.html"><![CDATA[<p>I just bought this small &amp; cheap camera from AliExpress and tested it under Linux. It has no name or brand, the manual says Mini camera, The smallest camera in the world. It can take pictures and video, has a wierd USB connector (probably <a href="http://connector.pinoutguide.com/8_pin_UC-E6_like-mini-usb_proprietary/">UC-E6</a>, ships with a cable) and can be used as a webcam.</p>

<p>It cost me about $12 together with a 8GB microSD card.</p>

<p><img src="/assets/2017-webcam1.webp" alt="photo of the camera" /></p>

<p>When you connect the cable, the SD card is mounted with no problem.</p>

<p>To use it as a webcam (I think I need to push the button on the cam after connecting the USB) I needed to reconfigure the <code class="language-plaintext highlighter-rouge">uvcvideo</code> module with a <code class="language-plaintext highlighter-rouge">quirks=2</code> option:</p>

<div class="language-sh highlighter-rouge"><div class="highlight"><pre class="highlight"><code><span class="nb">sudo </span>rmmod uvcvideo
<span class="nb">sudo </span>modprobe uvcvideo <span class="nv">quirks</span><span class="o">=</span>2
</code></pre></div></div>

<p>Note you can add this parameter to <code class="language-plaintext highlighter-rouge">/etc/modules</code> or <code class="language-plaintext highlighter-rouge">/etc/modprobe.d/</code>.</p>

<p>Then I can use <code class="language-plaintext highlighter-rouge">mplayer</code>, <code class="language-plaintext highlighter-rouge">mpv</code>, <code class="language-plaintext highlighter-rouge">cheese</code> or any other application to test it:</p>

<div class="language-sh highlighter-rouge"><div class="highlight"><pre class="highlight"><code>mplayer tv:// <span class="nt">--tv-device</span><span class="o">=</span>/dev/video0
mpv av://v4l2:/dev/video0
</code></pre></div></div>

<p><img src="/assets/2017-webcam2.webp" alt="photo of the camera" /></p>

<p>Some more information about the camera below:</p>

<div class="language-plaintext highlighter-rouge"><div class="highlight"><pre class="highlight"><code>$ sudo dmesg
[2031649.188998] usb 1-2: new high-speed USB device number 68 using xhci_hcd
[2031649.329890] usb 1-2: New USB device found, idVendor=1b3f, idProduct=2002
[2031649.329892] usb 1-2: New USB device strings: Mfr=1, Product=2, SerialNumber=0
[2031649.329894] usb 1-2: Product: GENERAL - UVC 
[2031649.329895] usb 1-2: Manufacturer: GENERAL
[2031649.330601] uvcvideo: Found UVC 1.00 device GENERAL - UVC  (1b3f:2002)
[2031649.330681] uvcvideo: UVC non compliance - GET_DEF(PROBE) not supported. Enabling workaround.
[2031649.330911] uvcvideo 1-2:1.0: Entity type for entity Processing 5 was not initialized!
[2031649.330913] uvcvideo 1-2:1.0: Entity type for entity Selector 4 was not initialized!
[2031649.330915] uvcvideo 1-2:1.0: Entity type for entity Camera 1 was not initialized!
[2031649.331054] input: GENERAL - UVC  as /devices/pci0000:00/0000:00:14.0/usb1/1-2/1-2:1.0/input/input438
$ lsusb 
Bus 001 Device 072: ID 1b3f:2002 Generalplus Technology Inc. 808 Camera #9 (web-cam mode)
$ v4l2-ctl -d 2 --all
Driver Info (not using libv4l2):
 Driver name   : uvcvideo
 Card type     : GENERAL - UVC 
 Bus info      : usb-0000:00:14.0-2
 Driver version: 4.9.6
 Capabilities  : 0x84200001
  Video Capture
  Streaming
  Extended Pix Format
  Device Capabilities
 Device Caps   : 0x04200001
  Video Capture
  Streaming
  Extended Pix Format
Priority: 2
Video input : 0 (Camera 1: ok)
Format Video Capture:
 Width/Height      : 640/480
 Pixel Format      : 'MJPG'
 Field             : None
 Bytes per Line    : 0
 Size Image        : 614400
 Colorspace        : Default
 Transfer Function : Default
 YCbCr/HSV Encoding: Default
 Quantization      : Default
 Flags             : 
Crop Capability Video Capture:
 Bounds      : Left 0, Top 0, Width 640, Height 480
 Default     : Left 0, Top 0, Width 640, Height 480
 Pixel Aspect: 1/1
Selection: crop_default, Left 0, Top 0, Width 640, Height 480
Selection: crop_bounds, Left 0, Top 0, Width 640, Height 480
Streaming Parameters Video Capture:
 Capabilities     : timeperframe
 Frames per second: 30.000 (30/1)
 Read buffers     : 0
                     brightness (int)    : min=1 max=255 step=1 default=16 value=16
</code></pre></div></div>

<p><img src="/assets/2017-webcam3.webp" alt="an ad for the camera" /></p>

<h1 id="update">Update</h1>

<p>After about two years of not using it very much the <strong>BATTERY EXPLODED</strong>.</p>

<p>I can still use it as webcam or when powered from USB.</p>]]></content><author><name></name></author><summary type="html"><![CDATA[I just bought this small &amp; cheap camera from AliExpress and tested it under Linux. It has no name or brand, the manual says Mini camera, The smallest camera in the world. It can take pictures and video, has a wierd USB connector (probably UC-E6, ships with a cable) and can be used as a webcam.]]></summary></entry><entry><title type="html">Autobuild LÖVE games on Travis CI</title><link href="/2017/01/19/love-2d-games-ci.html" rel="alternate" type="text/html" title="Autobuild LÖVE games on Travis CI" /><published>2017-01-19T00:00:00+00:00</published><updated>2017-01-19T00:00:00+00:00</updated><id>/2017/01/19/love-2d-games-ci</id><content type="html" xml:base="/2017/01/19/love-2d-games-ci.html"><![CDATA[<p>How to setup Travis CI and GitHub to automatically run tests, build .love files and Windows .exe from source for Love 2D games.</p>

<blockquote>
  <p>Note (2023): this guide is outdated and you probably want to use Github Actions instead</p>
</blockquote>

<h1 id="goals">Goals</h1>

<p>I have the code of my game written in LÖVE committed to GitHub and I want Travis CI to automatically:</p>

<ul>
  <li>package .love file,</li>
  <li>build Windows executable (.exe),</li>
  <li>build web version of the game (experimental),</li>
  <li>upload builds to <a href="https://help.github.com/articles/about-releases/">GitHub Releases</a>,</li>
  <li>deploy web build to <a href="https://pages.github.com/">GitHub Pages</a>,</li>
  <li>run tests (if there are any or at least test if the code compile),</li>
  <li>run custom build scripts (if you need to).</li>
</ul>

<h1 id="connect-travis-to-github">Connect Travis to GitHub</h1>

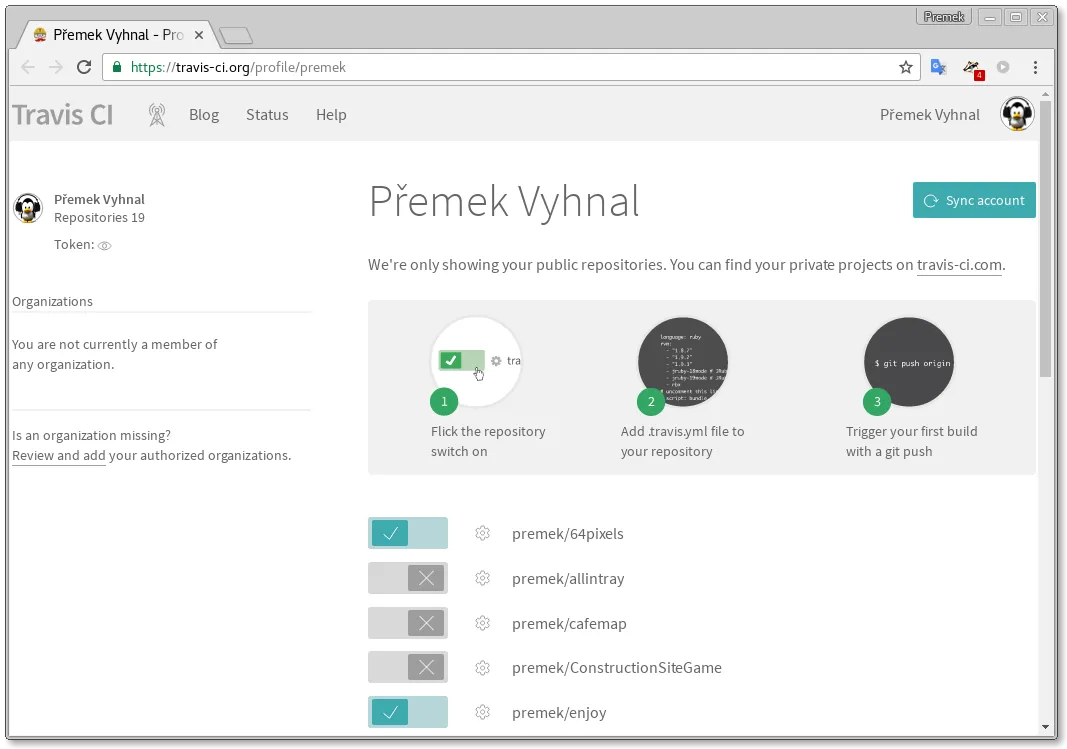
<p>Let’s assume you have your LÖVE game ready in its own repository on GitHub. If you didn’t do it already you can now login into <a href="https://travis-ci.org/">https://travis-ci.org/</a> using your GitHub account (which will be connected to Travis) and enable your repository in Travis.</p>

<p><img src="/assets/2017-travis.webp" alt="travis user profile screenshot" /></p>

<h1 id="tell-travis-what-to-build">Tell Travis what to build</h1>

<p>Now you need to add a <code class="language-plaintext highlighter-rouge">.travis.yml</code> file to your repository to tell Travis CI what to do. An example from my game is below.</p>

<div class="language-yaml highlighter-rouge"><div class="highlight"><pre class="highlight"><code><span class="na">language</span><span class="pi">:</span> <span class="s">bash</span>
<span class="na">sudo</span><span class="pi">:</span> <span class="no">false</span>
<span class="na">install</span><span class="pi">:</span> <span class="no">true</span>
<span class="na">addons</span><span class="pi">:</span>
  <span class="na">apt</span><span class="pi">:</span>
    <span class="na">packages</span><span class="pi">:</span>
    <span class="pi">-</span> <span class="s">lua5.1</span>
    <span class="pi">-</span> <span class="s">python2.7</span>
    <span class="pi">-</span> <span class="s">luarocks</span>
<span class="na">before_install</span><span class="pi">:</span>
  <span class="pi">-</span> <span class="s">luarocks install --local lpeg</span>
  <span class="pi">-</span> <span class="s2">"</span><span class="s">`luarocks</span><span class="nv"> </span><span class="s">path`"</span> <span class="c1"># execute the luarocks output - sets the paths for 'local' tree</span>
  
<span class="na">script</span><span class="pi">:</span> <span class="s2">"</span><span class="s">[[</span><span class="nv"> </span><span class="s">-n</span><span class="nv"> </span><span class="s">$TRAVIS_TAG</span><span class="nv"> </span><span class="s">]]</span><span class="nv"> </span><span class="s">&amp;&amp;</span><span class="nv"> </span><span class="s">./build.sh</span><span class="nv"> </span><span class="s">web</span><span class="nv"> </span><span class="s">||</span><span class="nv"> </span><span class="s">./build.sh"</span> <span class="c1"># web only for tags</span>
<span class="na">deploy</span><span class="pi">:</span>
  <span class="na">provider</span><span class="pi">:</span> <span class="s">releases</span>
  <span class="na">skip_cleanup</span><span class="pi">:</span> <span class="no">true</span>
  <span class="na">api_key</span><span class="pi">:</span>
    <span class="c1"># travis encrypt &lt;token&gt; </span>
    <span class="na">secure</span><span class="pi">:</span> <span class="s">2YJ2wzS9qRNrb2UMxsLlYoa6yR+h/9dWgMkLP9xUvy9tZ/Uheg5KKlrBESFd+Bz2hxjXgmoy5avEpmPLFyRF15nPW47QXbyIU0ambIALycU0cqPTzqu7uFjxSbPu7/AbT8p6jHnKpeGu3oYkDsxA3f0nRcZxJm9azcgSbMDQFlFZyVTZtCqMqVu7uVnFfbMw9EZRz6ldj/zd9TGnkECtnnx+hH2Xx3maozfsVXPJmZpRST+NfBbPqspOgPYNuxK7KKd4oBnpW3wKvMTFfnlpWmXhK9ahs/WGYfda8Xg262s25fqR/kTvnZWiVZaULL5M7Uax5xiIyU785scKJYrMkVATGss033pLhW9trXG874SHMWeozYnjemzACC0e0cLgBUpElR+M86u2R/zNA8ZHUwdrTf9TllEV6uV8yHkBxXK6ahl5ocyaYXSN/ezkzyeMstJeGLR6/TN3d3XLTfilEcsBOGJNNfACJtnnr5K7NcgyA2jVWUDF/NMyZlpQgU2TiW1SUwJG7rV5SaW0pXp1NCnH8v/HGqSzacEFzpsdhSPjqg6RGQ/SefhAZwD4COUdTzERfSJGs74xROPVKrMtmqQ56qIbhBWh6GQ0NzRTACw1wM2+skZKxekxc5xEjGZEdtgwedheaJISKSvFRbDZekZtX3+YCHOnTgMG/WYt52s=</span>
  <span class="na">file</span><span class="pi">:</span>
  <span class="pi">-</span> <span class="s">target/enjoy.love</span>
  <span class="pi">-</span> <span class="s">target/enjoy-win.zip</span>
  <span class="pi">-</span> <span class="s">target/enjoy-web.zip</span>
  <span class="na">on</span><span class="pi">:</span>
    <span class="na">tags</span><span class="pi">:</span> <span class="no">true</span>
    <span class="na">all_branches</span><span class="pi">:</span> <span class="no">true</span>
<span class="na">after_success</span><span class="pi">:</span>
<span class="pi">-</span> <span class="s2">"</span><span class="s">[[</span><span class="nv"> </span><span class="s">-n</span><span class="nv"> </span><span class="s">$TRAVIS_TAG</span><span class="nv"> </span><span class="s">]]</span><span class="nv"> </span><span class="s">&amp;&amp;</span><span class="nv"> </span><span class="s">./build.sh</span><span class="nv"> </span><span class="s">deploy</span><span class="nv"> </span><span class="s">$TRAVIS_REPO_SLUG"</span>
<span class="na">env</span><span class="pi">:</span>
  <span class="na">global</span><span class="pi">:</span>
   <span class="c1"># travis encrypt GH_TOKEN=&lt;token&gt;</span>
  <span class="pi">-</span> <span class="na">secure</span><span class="pi">:</span> <span class="s">ddpt+AFQ2nVBDaYXmODCsnwbUPyhBSN1VRwvrAzXnbgBAMGKs57tW+N4NBGQF6v32AX7G+LO4qjPumJ2f21SMH3AsPCNONzzA/kp/343oXqojVFZMyEfaE3tQOwvGteLF7RRF4AN+eTFrVEqb+ttn9ttu5yzdG0gyRt0p45bgtdGX+3S+B764nsf8jlbBaCSWM17alICW/NOefQiylNsrwRs0nR/pnUWXy+byAA2pUa3chDz4Kt6+SC5qyAD03Xap819n7IJrmejH42iAopFCpnDRCcfIh5eICp3m/cwnpwmDlH+4lkxfLPs8ZTFFkgdQKzYH8iQ9V/F9swez628oxilRR8e72e+PUCEyUdifX5XW9LqwDeQiKjbqq3/L+89EZYlxz7WtHMqAaLBXW0gGnqYnVAk0kXHbK4y1NVbUHv1TRMq1aznzXBtrsSOAaH8e4sqYx2rcZTYm1nqCleFBtQdcDL/6fTFjU6FY+g+gKfhx39YGgBBfLVDGqQ6yJ49PRJUvl1fvw4WCTdcO0YAlWk9v3AyhMiTspxavgmvZp3BpCnlJu7Ve0k9Tmf4gyVmow1D/Zgz6jMD47Gtad91aSy9LDrAUP70ywAwtVfgPoMNEh/6+brwAImNNZ2L6icvFz30nhIFUqR5Aiwy0PawcDJpXO0QXGmWRRIznLuvhAo=</span>

</code></pre></div></div>

<p>Interesting parts are:</p>

<ul>
  <li>packages — here you can install any Debian package you need for your build; we need lua for LÖVE, python is for the web build and I added luarocks which I use to install lpeg in the <code class="language-plaintext highlighter-rouge">before_install</code> section (you will not need this but you may add some other dependencies here),</li>
  <li>script — this is a bash command that runs our main build script; here we run <code class="language-plaintext highlighter-rouge">./build.sh web</code> for tagged commits and <code class="language-plaintext highlighter-rouge">./build.sh</code> for all the others; more about this script below,</li>
  <li>deploy — this section describes what files to deploy to the releases page on GitHub after a successful build; the <code class="language-plaintext highlighter-rouge">api_key</code> is used to authenticate Travis so it can upload files to your GitHub (details below),</li>
  <li>after_success — this command is executed after a successful build of a tagged commit (see the test for <code class="language-plaintext highlighter-rouge">$TRAVIS_TAG</code>) and here we call our script with the deploy command to <code class="language-plaintext highlighter-rouge">deploy</code> the web build to GitHub Pages,</li>
  <li>global — here we have an encrypted authorisation token again, this time for the deploy to GitHub Pages; see below for how to generate it.</li>
</ul>

<h1 id="configure-access-tokens">Configure access tokens</h1>

<p>To upload the results of the build back to GitHub, Travis will need an access token to your GitHub account.</p>

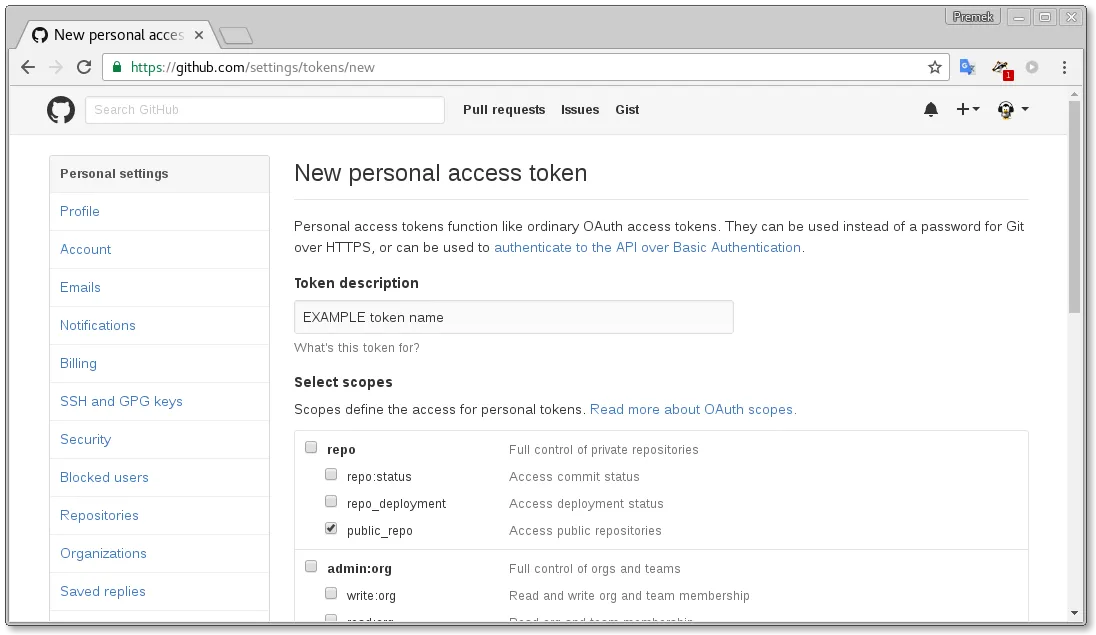
<p>You can generate one in <a href="https://github.com/settings/tokens">Settings -&gt; Personal access tokens</a>:</p>

<p><img src="/assets/2017-gh-token.webp" alt="new personal access token screenshot" /></p>

<p>Enter any descriptive name like “travis yourgame” and tick the “<strong>public_repo</strong>” checkbox and nothing else and then click “Generate token”.</p>

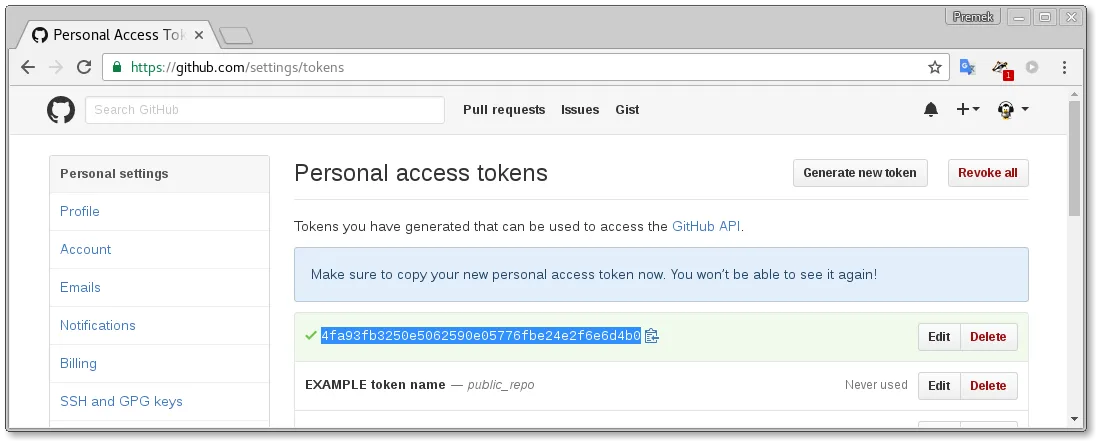
<p><img src="/assets/2017-gh-tokens.webp" alt="personal access tokens screenshot" /></p>

<p>As the GitHub says “<em>Make sure to copy your new personal access token now. You won’t be able to see it again!</em>”. Also do not show this token to anybody like I did here (I have invalidated my token after taking the screenshot). Anyone who would know this token is able to commit to your repository. So we will encrypt the token in a moment and then forget it forever.</p>

<p>You can also create the token from your command line:</p>

<div class="language-sh highlighter-rouge"><div class="highlight"><pre class="highlight"><code><span class="nv">$ </span>curl <span class="nt">-u</span> your.github.login@example.com <span class="se">\</span>
<span class="nt">-d</span> <span class="s1">'{"scopes":["public_repo"],"note":"EXAMPLE token name"}'</span> <span class="se">\</span>
https://api.github.com/authorizations
</code></pre></div></div>

<p>And look for something like this in the command output:</p>

<div class="language-plaintext highlighter-rouge"><div class="highlight"><pre class="highlight"><code>"token": "77527c7201c4d52e86edbdecab82d7344a2a4ca5",
</code></pre></div></div>

<h2 id="travis-cli-tool">Travis CLI tool</h2>

<p>Now we need to encrypt the token so we can securely put it into the public repository. We will use the Travis CLI tool for that which takes our secret and encrypts it with a private key known only to Travis. This way we can publish the encrypted token in our repository but only Travis will be able to decrypt it and use it to write back to the repository.</p>

<p>This private key is unique for each GitHub repository that we connect to Travis so we need to do this again for every new GitHub repository and update the .travis.yml.</p>

<p>To install the Travis CLI tool:</p>

<ol>
  <li>you will need <code class="language-plaintext highlighter-rouge">ruby</code> installed on your computer (see <a href="https://www.ruby-lang.org/en/downloads/">ruby website</a> for instructions),</li>
  <li>and then run <code class="language-plaintext highlighter-rouge">gem install travis</code>
You may need to use sudo or you can find detailed instructions on <a href="https://github.com/travis-ci/travis.rb#installation">Travis CLI readme</a> and <a href="https://docs.travis-ci.com/user/encryption-keys/">Travis docs</a>.</li>
</ol>

<p>You can test the travis tool is installed by running this on the command line:</p>

<div class="language-sh highlighter-rouge"><div class="highlight"><pre class="highlight"><code><span class="nv">$ </span>travis version
1.8.5
</code></pre></div></div>

<h2 id="encrypt-the-token">Encrypt the token</h2>

<p>Now you can finally encrypt the token you generated on GitHub. We will encrypt the token twice, first for deploy to GitHub Releases and second for deploy to GitHub Pages (see the .travis.yml file example again).</p>

<p>Call the travis tool with the <code class="language-plaintext highlighter-rouge">encrypt</code> command, your secret token and your GitHub “user/repository” name:</p>

<div class="language-sh highlighter-rouge"><div class="highlight"><pre class="highlight"><code><span class="nv">$ </span>travis encrypt 77527c7201c4d52e86edbdecab82d7344a2a4ca5 <span class="nt">-r</span> premek/enjoy
Please add the following to your .travis.yml file:
secure: <span class="s2">"XLN7VHZT3Gh5rCf6hCSQ+Gai5G0TWOWkJbiWErL+JcRvOIimMYY9B51mTcwWphJBPicmls5jw/8TrNrjvA2J1r+KnebL1XsRxOhyms6BQ+Q5J6g+SFbR/s3vvdjzNu9ygqRCL5d1ia3haQvz/rOS31FwuhDO+zE0jLTlSP2OIMUbowMLiGXb4mU0ib7voxnFyRJggaxLa4fFhVAbZu2HJILbFwBHc6tgAGRRTMoptnsmjmF5qBFJfbU70oE+vdOjOUCYwPaT1J+lK/eT6DeaY9i5SbCy1J4iz0AMiPzdi/3pLzX5qmYgjdDHH8cNgUiBXvCEgb28y3pI4b058Ehym+b1eeAHso0SHPy2pKht82e07XNdK/5kzjHUagMptzn4jT6ZWAhM0p1jxJ+3J/m2EsLSvoITNQi6eV5Y9O4ky6EGttHlLE6TrkdXprQQkkmgYN8/59RbM10aVtNWwOLZD5OSPBLyDi3/3qpxyEpZJZNHJK2lGur+YMPChzmZAZ1M9K/bQjYocsuZx4fzXfyKFg+yhmqvtgkqFf5RcOwsMVoLxwhunORTnktvL27pkpJPQwQi7zRTS7x+LRtt3QEa5ZLPSUSP072NkRuF8hZLlEQqZ3fv7UXR0XZxta7EC1/jbpueKx17cKYjtFREfo9Fpzfhpch0a94iziQ2TZH093o="</span>
Pro Tip: You can add it automatically by running with <span class="nt">--add</span><span class="nb">.</span>
</code></pre></div></div>

<p>The suggested <code class="language-plaintext highlighter-rouge">--add</code> option didn’t always worked fot my but you can copy the <code class="language-plaintext highlighter-rouge">secure: ...</code> part into the <code class="language-plaintext highlighter-rouge">deploy</code> section of your <code class="language-plaintext highlighter-rouge">.travis.yml</code>.</p>

<p>Then call the <code class="language-plaintext highlighter-rouge">travis</code> tool again, with the same token but in the form of <code class="language-plaintext highlighter-rouge">GH_TOKEN=token</code>:</p>

<div class="language-sh highlighter-rouge"><div class="highlight"><pre class="highlight"><code><span class="nv">$ </span>travis encrypt <span class="nv">GH_TOKEN</span><span class="o">=</span>77527c...4a2a4ca5 <span class="nt">-r</span> premek/enjoy
Please add the following to your .travis.yml file:
secure: <span class="s2">"DI8s6WpIAIE6aw1ZzFxF5kysby+7hATLKDREJ2IMz8zT2wUKFn0m11emDD0AfGpMrPCtzx2nsTng0XxJRv282tVsyYXaar9f9uGZEijhzRqGni7SxuR8lgsuSZL3bVGHY9ow+6l8GaFeENNeWziCfUVoynzAlonlIQJfBZUgwt3+i/0IiG2hgU54RVGreTmCBIhErECLvDhmxbEurE8MJfQDUBMcsxb9Sj7H1g9klhULNi4rPcWjTwIBjQrZZP93UoS4WWReLhTITDdeOk6Aj0CLBF2H/343S5KK9GUuJpmCQns6aXAL3XenEBNsp9H+VUBQIi7nMzsjnHAcv4fzaL0ADa+YnIdLKmITUCWfVBxrP+APKwgIQxqFoMynB6+FN7Ed1cFPWsmBI7JsGNnUTHx+xIEtscKu9pPfiFt2mYmdgKUjpPVU8aM115Xj5zcqXRFWuuyWjmnV75h4SDkzIbg66S6wEr3BVDHZgTBRba5qGH+e6SVydkLdtJiQCkwpCGj8mgJsn7ZlQupotHksOH2+qziebmwTfYJb7LL9fe22EETJTrm36YWt9A6rFHFjhIH86bPIIoDJm9iCb/BEIh/nPo7+JMyKuai/vCy7PRcZA1/nEwblF04ypq1HGKq+vskgn0QF7rmG3onIb31w2rpvu6hS3Vy1jP/7istpi4g="</span>
Pro Tip: You can add it automatically by running with <span class="nt">--add</span><span class="nb">.</span>
</code></pre></div></div>

<p>And copy the <code class="language-plaintext highlighter-rouge">secure: ...</code> part into the <code class="language-plaintext highlighter-rouge">global</code> part at the end of your <code class="language-plaintext highlighter-rouge">.travis.yml</code>.</p>

<p>That should be it for the <code class="language-plaintext highlighter-rouge">.travis.yml</code> file.</p>

<h1 id="custom-build-script">Custom build script</h1>

<p>Let’s look at a script I use. It is in the <code class="language-plaintext highlighter-rouge">build.sh</code> file referenced from the <code class="language-plaintext highlighter-rouge">.travis.yml</code>.</p>

<div class="language-sh highlighter-rouge"><div class="highlight"><pre class="highlight"><code><span class="c">#!/usr/bin/env bash</span>
<span class="nb">set</span> <span class="nt">-x</span>

<span class="nv">P</span><span class="o">=</span><span class="s2">"enjoy"</span>
<span class="nv">LV</span><span class="o">=</span><span class="s2">"0.10.1"</span> <span class="c"># love version</span>
<span class="nv">LZ</span><span class="o">=</span><span class="s2">"https://bitbucket.org/rude/love/downloads/love-</span><span class="k">${</span><span class="nv">LV</span><span class="k">}</span><span class="s2">-win32.zip"</span>

<span class="c">### clean</span>
<span class="k">if</span> <span class="o">[</span> <span class="s2">"</span><span class="nv">$1</span><span class="s2">"</span> <span class="o">==</span> <span class="s2">"clean"</span> <span class="o">]</span><span class="p">;</span> <span class="k">then
 </span><span class="nb">rm</span> <span class="nt">-rf</span> <span class="s2">"target"</span>
 <span class="nb">exit</span><span class="p">;</span>
<span class="k">fi</span>

<span class="c">### deploy web version to github pages</span>
<span class="k">if</span> <span class="o">[</span> <span class="s2">"</span><span class="nv">$1</span><span class="s2">"</span> <span class="o">==</span> <span class="s2">"deploy"</span> <span class="o">]</span><span class="p">;</span> <span class="k">then
 </span><span class="nb">cd</span> <span class="s2">"target/</span><span class="k">${</span><span class="nv">P</span><span class="k">}</span><span class="s2">-web"</span>
 git init
 git config user.name <span class="s2">"autodeploy"</span>
 git config user.email <span class="s2">"autodeploy"</span>
 <span class="nb">touch</span> <span class="nb">.</span>
 git add <span class="nb">.</span>
 git commit <span class="nt">-m</span> <span class="s2">"deploy to github pages"</span>
 git push <span class="nt">--force</span> <span class="nt">--quiet</span> <span class="s2">"https://</span><span class="k">${</span><span class="nv">GH_TOKEN</span><span class="k">}</span><span class="s2">@github.com/</span><span class="k">${</span><span class="nv">2</span><span class="k">}</span><span class="s2">.git"</span> master:gh-pages
 <span class="nb">exit</span><span class="p">;</span>
<span class="k">fi</span>

<span class="c">##### build #####</span>
find <span class="nb">.</span> <span class="nt">-iname</span> <span class="s2">"*.lua"</span> | xargs luac <span class="nt">-p</span> <span class="o">||</span> <span class="o">{</span> <span class="nb">echo</span> <span class="s1">'luac parse test failed'</span> <span class="p">;</span> <span class="nb">exit </span>1<span class="p">;</span> <span class="o">}</span>
<span class="nb">mkdir</span> <span class="s2">"target"</span>

<span class="c">### .love</span>
<span class="nb">cp</span> <span class="nt">-r</span> src target	
<span class="nb">cd </span>target/src

<span class="c"># compile .ink story into lua table so the runtime will not need lpeg dep.</span>
lua lib/pink/pink/pink.lua parse game.ink <span class="o">&gt;</span> game.lua

<span class="c"># .love file</span>
zip <span class="nt">-9</span> <span class="nt">-r</span> - <span class="nb">.</span> <span class="o">&gt;</span> <span class="s2">"../</span><span class="k">${</span><span class="nv">P</span><span class="k">}</span><span class="s2">.love"</span>
<span class="nb">cd</span> -

<span class="c">### .exe</span>
<span class="k">if</span> <span class="o">[</span> <span class="o">!</span> <span class="nt">-f</span> <span class="s2">"target/love-win.zip"</span> <span class="o">]</span><span class="p">;</span> <span class="k">then </span>wget <span class="s2">"</span><span class="nv">$LZ</span><span class="s2">"</span> <span class="nt">-O</span> <span class="s2">"target/love-win.zip"</span><span class="p">;</span> <span class="k">fi
</span>unzip <span class="nt">-o</span> <span class="s2">"target/love-win.zip"</span> <span class="nt">-d</span> <span class="s2">"target"</span>
<span class="nv">tmp</span><span class="o">=</span><span class="s2">"target/tmp/"</span>
<span class="nb">mkdir</span> <span class="nt">-p</span> <span class="s2">"</span><span class="nv">$tmp</span><span class="s2">/</span><span class="nv">$P</span><span class="s2">"</span>
<span class="nb">cat</span> <span class="s2">"target/love-</span><span class="k">${</span><span class="nv">LV</span><span class="k">}</span><span class="s2">-win32/love.exe"</span> <span class="s2">"target/</span><span class="k">${</span><span class="nv">P</span><span class="k">}</span><span class="s2">.love"</span> <span class="o">&gt;</span> <span class="s2">"</span><span class="nv">$tmp</span><span class="s2">/</span><span class="k">${</span><span class="nv">P</span><span class="k">}</span><span class="s2">/</span><span class="k">${</span><span class="nv">P</span><span class="k">}</span><span class="s2">.exe"</span>
<span class="nb">cp  </span>target/love-<span class="s2">"</span><span class="k">${</span><span class="nv">LV</span><span class="k">}</span><span class="s2">"</span><span class="nt">-win32</span>/<span class="k">*</span>dll target/love-<span class="s2">"</span><span class="k">${</span><span class="nv">LV</span><span class="k">}</span><span class="s2">"</span><span class="nt">-win32</span>/license<span class="k">*</span> <span class="s2">"</span><span class="nv">$tmp</span><span class="s2">/</span><span class="nv">$P</span><span class="s2">"</span>
<span class="nb">cd</span> <span class="s2">"</span><span class="nv">$tmp</span><span class="s2">"</span>
zip <span class="nt">-9</span> <span class="nt">-r</span> - <span class="s2">"</span><span class="nv">$P</span><span class="s2">"</span> <span class="o">&gt;</span> <span class="s2">"</span><span class="k">${</span><span class="nv">P</span><span class="k">}</span><span class="s2">-win.zip"</span>
<span class="nb">cd</span> -
<span class="nb">cp</span> <span class="s2">"</span><span class="nv">$tmp</span><span class="s2">/</span><span class="k">${</span><span class="nv">P</span><span class="k">}</span><span class="s2">-win.zip"</span> <span class="s2">"target/"</span>
<span class="nb">rm</span> <span class="nt">-r</span> <span class="s2">"</span><span class="nv">$tmp</span><span class="s2">"</span>

<span class="c">### web</span>
<span class="k">if</span> <span class="o">[</span> <span class="s2">"</span><span class="nv">$1</span><span class="s2">"</span> <span class="o">==</span> <span class="s2">"web"</span> <span class="o">]</span><span class="p">;</span> <span class="k">then
</span><span class="nb">cd </span>target
<span class="nb">rm</span> <span class="nt">-rf</span> love.js <span class="k">*</span><span class="nt">-web</span><span class="k">*</span>
git clone https://github.com/TannerRogalsky/love.js.git
<span class="nb">cd </span>love.js
git checkout 6fa910c2a28936c3ec4eaafb014405a765382e08
git submodule update <span class="nt">--init</span> <span class="nt">--recursive</span>

<span class="nb">cd </span>release-compatibility
python ../emscripten/tools/file_packager.py game.data <span class="nt">--preload</span> ../../../target/src/@/ <span class="nt">--js-output</span><span class="o">=</span>game.js
<span class="c">#yes, two times!</span>
<span class="c"># python -m SimpleHTTPServer 8000</span>
<span class="nb">cd</span> ../..
<span class="nb">cp</span> <span class="nt">-r</span> love.js/release-compatibility <span class="s2">"</span><span class="nv">$P</span><span class="s2">-web"</span>
zip <span class="nt">-9</span> <span class="nt">-r</span> - <span class="s2">"</span><span class="nv">$P</span><span class="s2">-web"</span> <span class="o">&gt;</span> <span class="s2">"</span><span class="k">${</span><span class="nv">P</span><span class="k">}</span><span class="s2">-web.zip"</span>
<span class="c"># target/$P-web/ goes to webserver</span>
<span class="k">fi</span>
</code></pre></div></div>

<p>At the beginning there is a name of my game and it will be used in target filenames (“enjoy” here; the resulting files will be enjoy.love, enjoy-win.zip, etc).</p>

<p>Also we define LÖVE version to be used.</p>

<p>The “clean” block is executed only if we run the script as <code class="language-plaintext highlighter-rouge">./build.sh clean</code> and it just deletes all the files created during the build. It is useful for local testing.</p>

<p>We will get back to the “deploy” part later.</p>

<p>Then we call <code class="language-plaintext highlighter-rouge">luac</code> on all .lua files to check for syntax errors. If there are any, we exit the script with 1 exit status which will <strong>mark the build as failed</strong> and Travis will send you an email about this. (If everything is OK the status is 0.)</p>

<p>If everything is OK we copy the <code class="language-plaintext highlighter-rouge">src</code> directory to <code class="language-plaintext highlighter-rouge">target</code> and zip everything to create the .love file. We can also run custom scripts here like I did to compile my story files into a distributable format.</p>

<p>For Windows .exe file we need to download LÖVE binary from the internet and concatenate it with our .love file.</p>

<p>The web version is built only for tagged commits (we will get back to it) and it uses the great <a href="https://github.com/TannerRogalsky/love.js">love.js</a> project (which is cloned from github in my build script).</p>

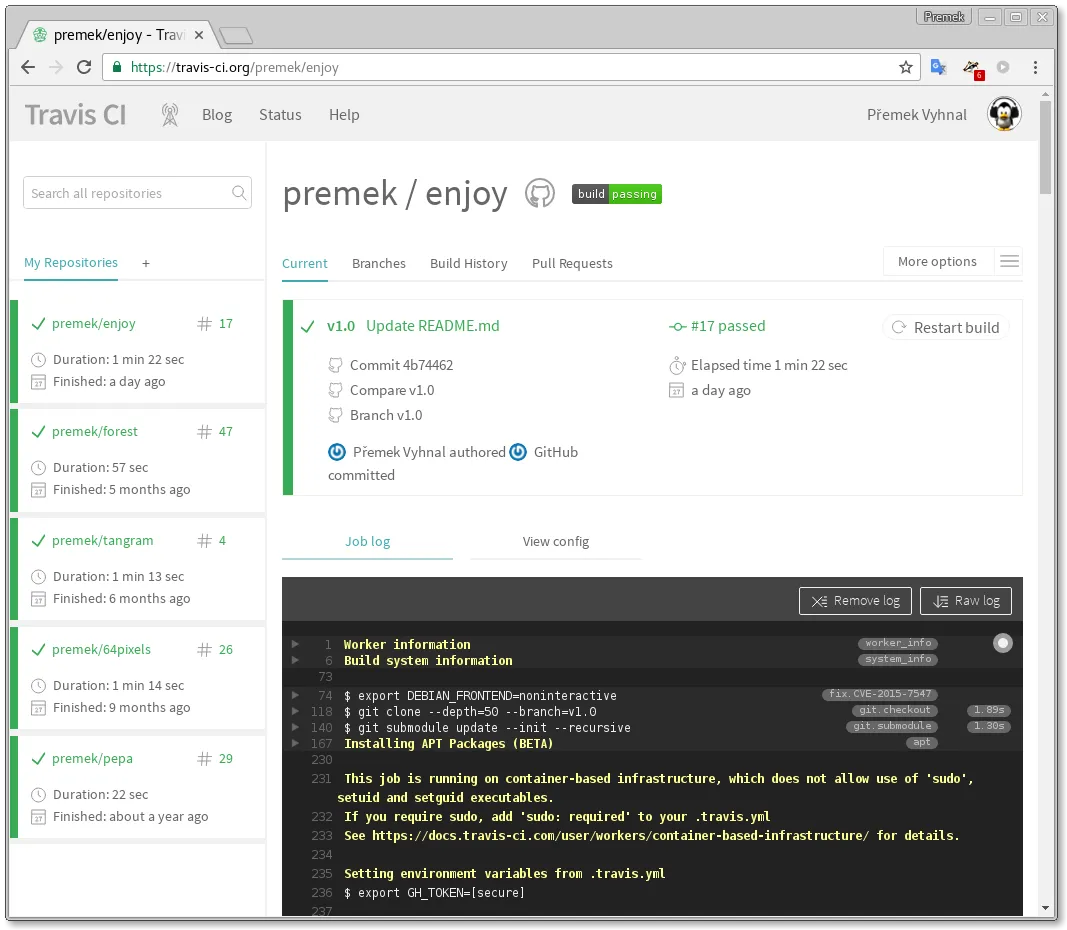
<p>Now we should be able to make any commit to the repository and see how it is being built almost immediately on Travis:</p>

<p><img src="/assets/2017-travis-build.webp" alt="travis build screenshot" /></p>

<h1 id="deploy-the-release">Deploy the release</h1>

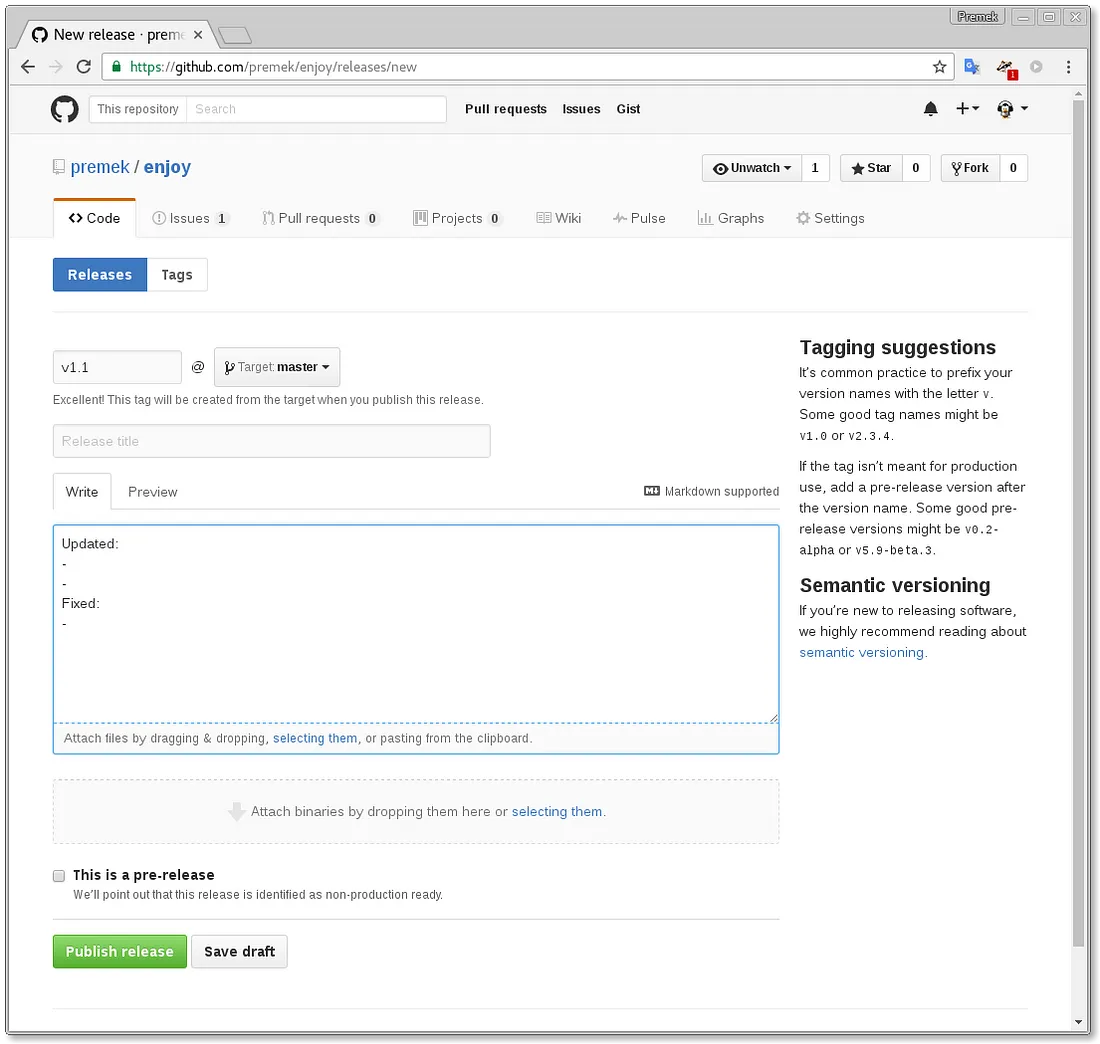
<p>The build.sh script defined in .travis.yml file does run <strong>after each commit</strong> to the repository (to warn you in case you break something with the commit) but the <strong>web build and the deployments</strong> are done only <strong>after you make a “release”</strong> on GitHub. You can do it on the Code -&gt; Releases tab:</p>

<p><img src="/assets/2017-gh-releases.webp" alt="github releases screenshot" /></p>

<p>After you click Publish release, GitHub automatically creates .zip and .tar.gz archives of your source code.</p>

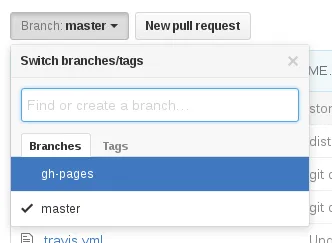
<p>Travis will run this build with <code class="language-plaintext highlighter-rouge">$TRAVIS_TAG</code> set so it will trigger the build of “web” version and also the “deploy” part (see .travis.yml again). The “deploy” part will use the <code class="language-plaintext highlighter-rouge">git</code> command with the <code class="language-plaintext highlighter-rouge">GH_TOKEN</code> variable to commit the web build files to GitHub to the <code class="language-plaintext highlighter-rouge">gh-pages</code> branch.</p>

<p><img src="/assets/2017-gh-branches.webp" alt="github branches screenshot" /></p>

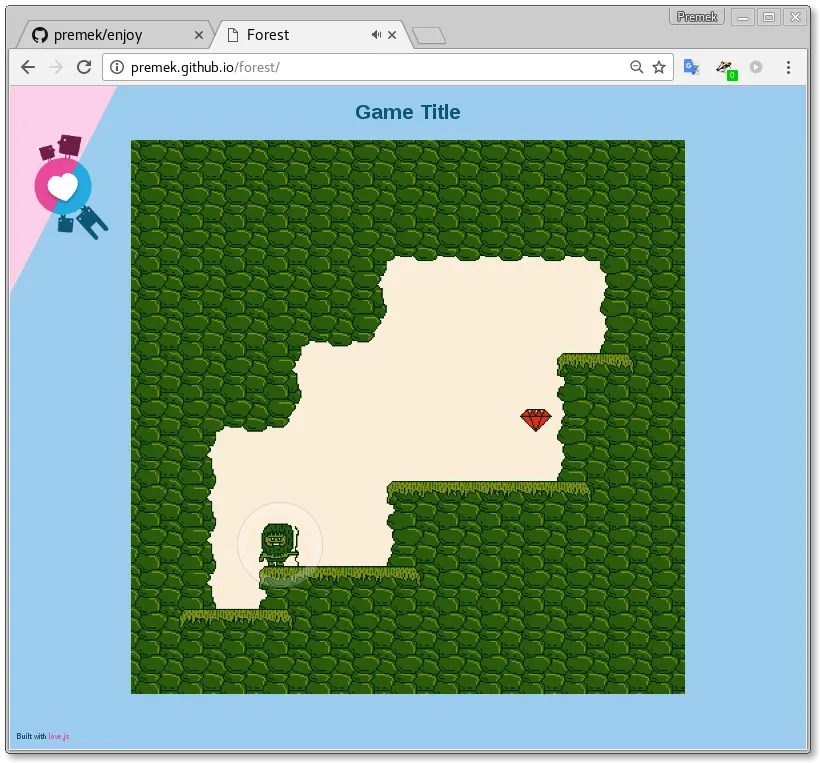
<p>This branch is a special one — everything you commit to it is avilable as a webpage on <code class="language-plaintext highlighter-rouge">https://&lt;user&gt;.github.io/&lt;repository&gt;/</code>:</p>

<p><img src="/assets/2017-web-build.webp" alt="love2d game running in a browser" /></p>

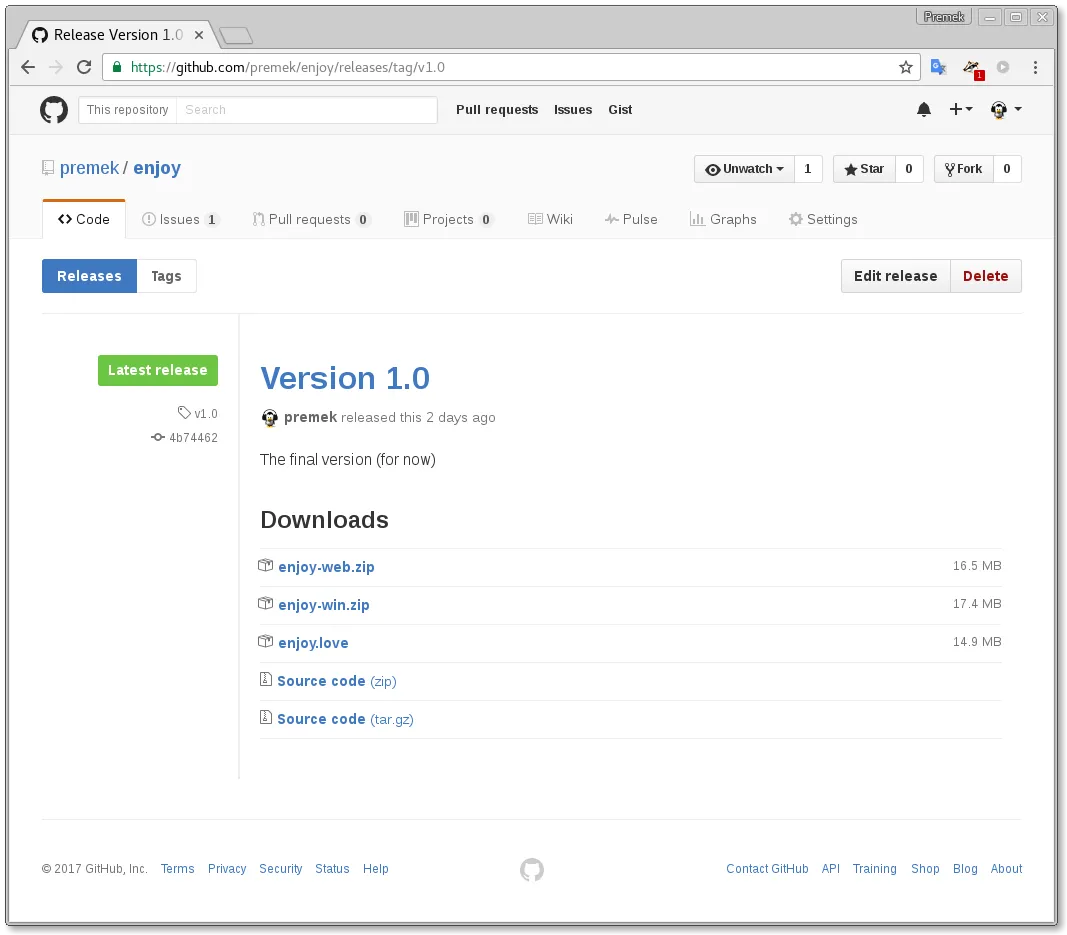
<p>The <code class="language-plaintext highlighter-rouge">deploy</code> section of <code class="language-plaintext highlighter-rouge">.travis.yml</code> file is also executed for “release” commits and it just uploads the specified files to the release page on GitHub. So after the build we can see our .love file and the .zip containing the .exe file on our release page where there were previously just the .zip and .tar.gz source archives. You can link to these files from anywhere to allow users downloading your game.</p>

<p><img src="/assets/2017-gh-release.webp" alt="github release screenshot with uploaded artifacts" /></p>

<h1 id="build-status-icon">Build status icon</h1>
<p>As a final touch you can add a nice status icon to your <code class="language-plaintext highlighter-rouge">readme.md</code> file:</p>

<div class="language-md highlighter-rouge"><div class="highlight"><pre class="highlight"><code><span class="p">[</span><span class="nv">![autobuild status</span><span class="p">](</span><span class="sx">https://travis-ci.org/premek/enjoy.svg</span><span class="p">)</span>](https://travis-ci.org/premek/enjoy)
</code></pre></div></div>

<h1 id="whats-next">What’s next?</h1>
<p>More items to explore:</p>

<ul>
  <li>Android builds</li>
  <li>Mac builds</li>
  <li>change the icon of the .exe using <a href="https://github.com/electron/rcedit">rcedit</a> (windows only tool)</li>
  <li>more tests?</li>
  <li><a href="https://github.com/MisterDA/love-release">love-release</a></li>
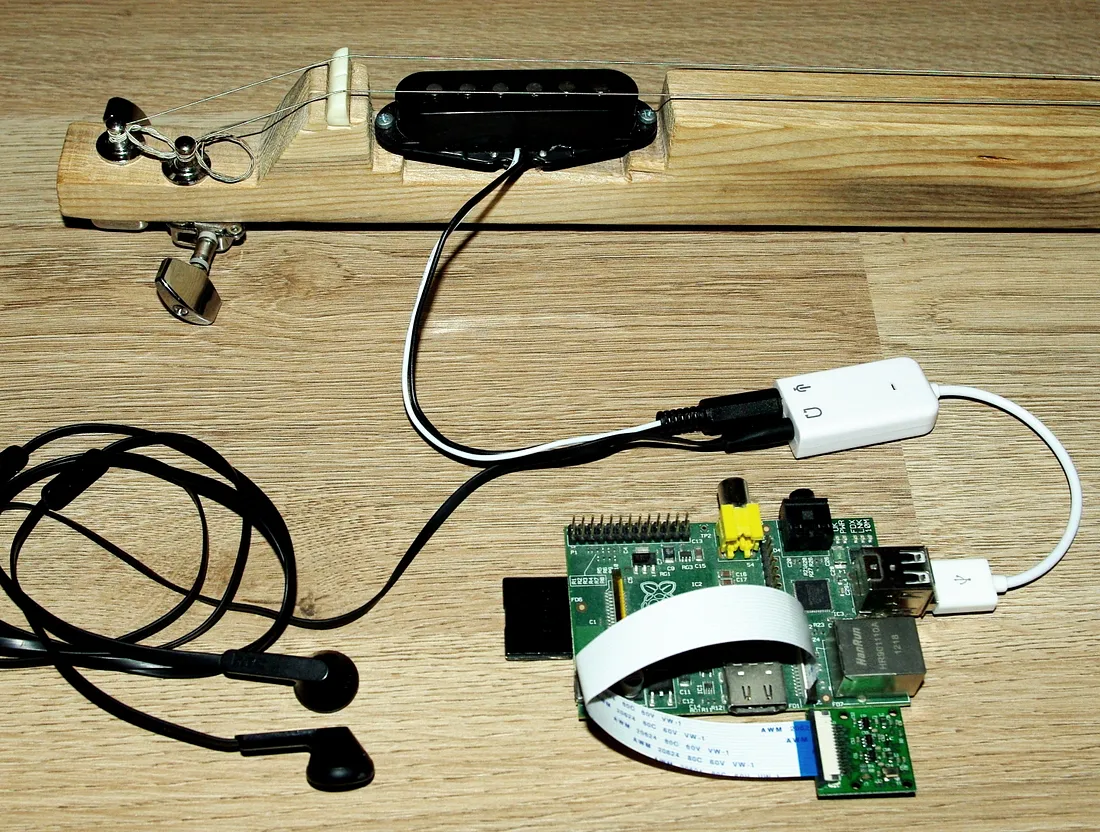
</ul>]]></content><author><name></name></author><summary type="html"><![CDATA[How to setup Travis CI and GitHub to automatically run tests, build .love files and Windows .exe from source for Love 2D games.]]></summary></entry><entry><title type="html">A “guitar” powered by Raspberry Pi &amp;amp; ChucK</title><link href="/2016/12/28/raspberry-pi-chuck-guitar-effect.html" rel="alternate" type="text/html" title="A “guitar” powered by Raspberry Pi &amp;amp; ChucK" /><published>2016-12-28T00:00:00+00:00</published><updated>2016-12-28T00:00:00+00:00</updated><id>/2016/12/28/raspberry-pi-chuck-guitar-effect</id><content type="html" xml:base="/2016/12/28/raspberry-pi-chuck-guitar-effect.html"><![CDATA[<p>I made me an electric guitar from a piece of wood and a few of the cheapest guitar parts. This is how to connect it to Raspberry Pi and how to setup ChucK to be able to program an effect in it.</p>

<p><img src="/assets/2016-guitar.webp" alt="photo of my guitar" /></p>

<p>I used an old Raspberry Pi with 1$ USB sound card connected to it and headphones and my “guitar” connected to the sound card.</p>

<p>On the Raspberry I’m running Raspbian so installing chuck was easy:</p>

<div class="language-plaintext highlighter-rouge"><div class="highlight"><pre class="highlight"><code>$ sudo aptitude install chuck
</code></pre></div></div>

<p>Now I needed to configure chuck input and output to use my USB sound card which is done by <code class="language-plaintext highlighter-rouge">--dacN</code> and <code class="language-plaintext highlighter-rouge">--adcN</code> command line options.</p>

<blockquote>
  <p><strong>dac</strong> means digital-to-analog converter and represents audio <strong>output (headphones)</strong></p>

  <p><strong>adc</strong> is analog-to-digital converted and represents audio <strong>input (mic)</strong></p>
</blockquote>

<p>Default <code class="language-plaintext highlighter-rouge">chuck</code> command uses <code class="language-plaintext highlighter-rouge">jack</code> which I don’t have installed so I’m using <code class="language-plaintext highlighter-rouge">chuck.alsa</code> command everywhere. <code class="language-plaintext highlighter-rouge">--probe</code> option lists available devices that can be used.</p>

<div class="language-plaintext highlighter-rouge"><div class="highlight"><pre class="highlight"><code>$ chuck.alsa --probe
</code></pre></div></div>

<p>First I found the one used for output (dac — the headphones) using the following little ChucK script which just plays sine wave for 3 seconds. In my case it was device number 3.</p>

<div class="language-plaintext highlighter-rouge"><div class="highlight"><pre class="highlight"><code>SinOsc s =&gt; dac;
3::second =&gt; now;
</code></pre></div></div>

<div class="language-plaintext highlighter-rouge"><div class="highlight"><pre class="highlight"><code>$ chuck.alsa --dac3 test-dac.ck
</code></pre></div></div>

<p>To test the input device setting (adc) I used another ChucK script which just repeats to the headphones what it hears on the mic. When looking for adc device in the <code class="language-plaintext highlighter-rouge">--probe</code> output, don’t get confused by the “dac” in the titles, look for a device which has e.g. <code class="language-plaintext highlighter-rouge">input channels = 1</code>.</p>

<div class="language-plaintext highlighter-rouge"><div class="highlight"><pre class="highlight"><code>adc =&gt; dac;
3::second =&gt; now;
</code></pre></div></div>

<div class="language-plaintext highlighter-rouge"><div class="highlight"><pre class="highlight"><code>chuck.alsa --dac3 --adc3 --in1 --bufsize100 adc_to_dac.ck
</code></pre></div></div>

<p>The <code class="language-plaintext highlighter-rouge">--in1</code> parameter should match the number of input channels in <code class="language-plaintext highlighter-rouge">chuck.alsa --probe</code> output.</p>

<p>The <code class="language-plaintext highlighter-rouge">--bufsize</code> parameter is used to lower the latency.</p>

<p>Now we should have ChucK running and configured to play whatever we play on the guitar. Now we can try to create our custom guitar effect. The script below is just an example.</p>

<div class="language-plaintext highlighter-rouge"><div class="highlight"><pre class="highlight"><code>adc =&gt; NRev r =&gt; Gain AM =&gt; SinOsc od =&gt; dac;
3 =&gt; AM.op;
1 =&gt; od.sync;
day =&gt; now;
</code></pre></div></div>

<iframe width="100%" height="166" scrolling="no" frameborder="no" allow="autoplay" src="https://w.soundcloud.com/player/?url=https%3A//api.soundcloud.com/tracks/299940814&amp;color=%23ff5500&amp;auto_play=false&amp;hide_related=false&amp;show_comments=true&amp;show_user=true&amp;show_reposts=false&amp;show_teaser=true"></iframe>
<div style="font-size: 10px; color: #cccccc;line-break: anywhere;word-break: normal;overflow: hidden;white-space: nowrap;text-overflow: ellipsis; font-family: Interstate,Lucida Grande,Lucida Sans Unicode,Lucida Sans,Garuda,Verdana,Tahoma,sans-serif;font-weight: 100;"><a href="https://soundcloud.com/premek-v" title="Premek Vyhnal" target="_blank" style="color: #cccccc; text-decoration: none;">Premek Vyhnal</a> · <a href="https://soundcloud.com/premek-v/test-01" title="Test 01" target="_blank" style="color: #cccccc; text-decoration: none;">Test 01</a></div>

<p>If you are satisfied with your script you can add a line like <code class="language-plaintext highlighter-rouge">chuck.alsa … g.ck &amp;</code> to <code class="language-plaintext highlighter-rouge">/etc/rc.local</code> to run it automatically after booting. Then you can just connect the raspberry to power at any time and you can play.</p>

<p>If you want to <em>record</em> what you play, you can use the rec.ck program which comes with ChucK examples or you can download it from here: http://chuck.cs.princeton.edu/doc/examples/basic/rec.ck</p>

<p>To use it, just run chuck with both your program and rec.ck. Add the filename you want to record to after the rec.ck like this:</p>

<div class="language-plaintext highlighter-rouge"><div class="highlight"><pre class="highlight"><code>chuck.alsa --dac3 --adc3 --in1 --bufsize100 g.ck rec.ck:file.wav
</code></pre></div></div>

<iframe width="100%" height="166" scrolling="no" frameborder="no" allow="autoplay" src="https://w.soundcloud.com/player/?url=https%3A//api.soundcloud.com/tracks/299951364&amp;color=%23ff5500&amp;auto_play=false&amp;hide_related=false&amp;show_comments=true&amp;show_user=true&amp;show_reposts=false&amp;show_teaser=true"></iframe>
<div style="font-size: 10px; color: #cccccc;line-break: anywhere;word-break: normal;overflow: hidden;white-space: nowrap;text-overflow: ellipsis; font-family: Interstate,Lucida Grande,Lucida Sans Unicode,Lucida Sans,Garuda,Verdana,Tahoma,sans-serif;font-weight: 100;"><a href="https://soundcloud.com/premek-v" title="Premek Vyhnal" target="_blank" style="color: #cccccc; text-decoration: none;">Premek Vyhnal</a> · <a href="https://soundcloud.com/premek-v/test-02" title="Test 02" target="_blank" style="color: #cccccc; text-decoration: none;">Test 02</a></div>]]></content><author><name></name></author><summary type="html"><![CDATA[I made me an electric guitar from a piece of wood and a few of the cheapest guitar parts. This is how to connect it to Raspberry Pi and how to setup ChucK to be able to program an effect in it.]]></summary></entry></feed>